For my CSE 408 class, Multimedia Information Systems, we need to use an image API to complete some of our projects. ImageMagick (http://www.imagemagick.org/script/index.php) was recommended by Prof. Candan and Magick++ is the C++ api for the ImageMagick library. I spent some time getting it working in Visual Studio 2010 and it required a few more steps than the usual additional dependency paths in Visual Studio so I decided to blog them up for my group and anyone else having some trouble getting Magick++ working.
Disclaimer: I’m by no means a super-experienced programmer yet, nor am I a master of ImageMagick or Magick++. I’m sure there’s a billion ways to get ImageMagick into your program. This is just one way (the easiest I could figure out) to get Magick++ runing on my personal copy of Visual Studio 2010 for C++ coding. Hope it helps!
Step 1: Download Magick++
http://www.imagemagick.org/Magick++/
Under the heading, “Obtaining Magick++”, follow the “ftp” link then choose a download mirror for wherever you live. You should now see an ftp listing if you didn’t go to sourceforge or somewhere like that. Scroll down and click on the “binaries” directory and I downloaded “ImageMagick-6.8.6-9-Q16-x86-dll.exe” (6.8.6-9 was the current version at the time).
Step 2: Install Magick++
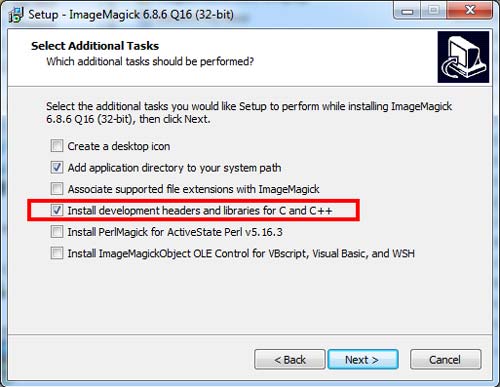
Run the .exe and next, next, next until you get to the screen below and make sure to select “install development headers for C and C++.” Also make sure to note the install path because we need that later.
Finish the installation and launch Visual Studio 2010.
Step 3: Adding Magick++ to a project
Open your project properties and at the top, set the Configuration to “All configurations” or Release(Active).
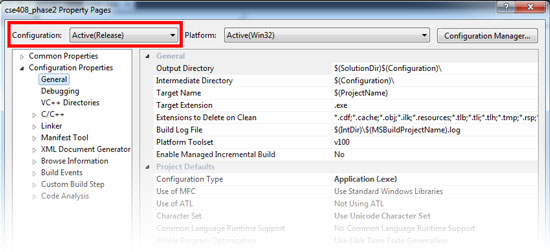
Magick++ doesn’t like to run in Visual Studio’s Debug mode so you have to build as a Release or ImageMagick won’t be happy.
In the project properties list on the left side, expand
Configuration Properties->General
Add the ImageMagick Include folder as an Additional Dependency. This is where you need to know where you installed ImageMagick too.
Next select “Code Generation” under the C/C++ section on the left sidebar of the project properties and ensure that “Runtime Library” is “Multi-Threaded (/MT)”
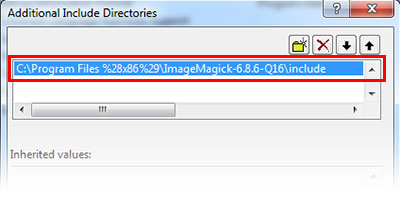
Expand the “Linker” section under C/C++ and add the lib directory for ImageMagick as an Additional Dependency (like in the image above, just “lib” instead of “include.”
Almost there.. now click on “Input” under the Linker section on the left sidebar. Add one more Additional Dependency and add these:
CORE_RL_magick_.lib
CORE_RL_Magick++_.lib
CORE_RL_wand_.lib
X11.lib
I’m pretty sure X11.lib was part of this, but I could be wrong. It looks out of place at the moment.. Save and close your project properties!
Step 4: Adding the header and namespace
Now, you should just simply have to
#include <Magick++.h>
and
using namespace Magick;
or use the individual
Magick::
namespace identifiers and you should be good to go!
Your images are not showing up. Otherwise it is a very interesting post.
Oops! Thanks for the post. Migrated to a different host..
Very helpful, thanks!
Thank you for your information on ImageMagick.
I download the ImageMagik-6.9.1-10 but unable to find any lib or exe.
I am using VS2013 and VS2015.
I like to use it as experiment under Window 10.
Any help will be very much appreciated.
Best regards
Agha Khan
I believe the Windows ImageMagick download installs the libraries somewhere specified during the install.
How can I do it on Visual Studio 2015?
Hi, just in case anyone else stumbling into this tutorial in 2017, just like me..
Libs are now called the following
CORE_RL_Magick++_.lib
CORE_RL_MagickCore_.lib
CORE_RL_MagickWand_.lib
And now X11.lib included or needed (was already assumed in the tutorial itself :p)
I just set it up in VS2015 and everything builds fine, didn’t tested out actually functions of the lib (only included header so far) but i am quite confident it’ll work 😉
You should change your runtime library (Project Properties -> C/C++ -> Code Generation) to “Multi-threaded (/MT)” for Release configuration and “Multi-threaded Debug (/MTd)” for Debug configuration.
Should build in both configurations then.
In case you are changing the Runtime Library be aware that you may have to check if other libs you use will work with it. Can be a quite unstatisfying task 😛
Have a nice day 🙂
Well… In addition:
Seems like you can set up everything fine for compiling and building in Debug configuration, but it looks, like Magick++ still fails when you run the programm in Debug configuration. So.. You still have to run the program in Release Configuration 😉
Thanks for the comment! I haven’t used Image Magick in a few years so Im not on top of changes.
Marcel, Do you have sample VS project/solution that builds fine. I am following similar instructions to set things up in VS2017 but keep getting linker errors like this “LNK2001 unresolved external symbol “public: __thiscall Magick::Geometry::~Geometry(void)” (??1Geometry@Magick@@QAE@XZ)…”
I checked my “Additional library directories” point to “C:\Program Files\ImageMagick-7.0.6-Q16\lib” and not quite sure what to do to resolve the issue,
My code is pretty simple from image magic web site as follows. Any help is deeply appreciated.
————-
#include
#include
using namespace std;
using namespace Magick;
int main(int argc, char **argv)
{
InitializeMagick(*argv);
// Construct the image object. Seperating image construction from the
// the read operation ensures that a failure to read the image file
// doesn’t render the image object useless.
Image image;
try {
// Read a file into image object
image.read(“logo:”);
// Crop the image to specified size (width, height, xOffset, yOffset)
image.crop(Geometry(100, 100, 100, 100));
// Write the image to a file
image.write(“logo.png”);
}
catch (Exception &error_)
{
cout << "Caught exception: " << error_.what() << endl;
return 1;
}
return 0;
}
————-
thanks.
Hi, I am new to Image magick and Virtual studio. I am following this tutorial. But I am getting the following error.
Severity Code Description Project File Line Suppression State
Error LNK1104 cannot open file ‘X11.lib’
Does anyone know how to resolve this issue?
Its annoying but imagemagick are not providing debug libraries, so if you test your code in debug mode strange errors will occur (with corrupted filenames) and you will spend ages trying to debug them. Basically you have to build the library yourself.